Run AtomicStudio.exe

On that dialog, it would be nice to click on the sponsor. If you click on the sponsor this
dialog won't appear anymore for the current day. Atomic is totally free and not limited,
it's a way to help me to cover costs, like hosting and development software or offer me a
drink! :o)
But you may also click the Close button directly.
Once you clicked on Close, Atomic Studio will be ready to use.
Close
Click on New Project button, then enter a
Project Name, and finally click the OK
button.

Next you will be prompted for a confirmation, afterwards you'll be greeted by blank project.
Close
Click on New Screen button, then enter a Screen Name,
select a list of games to launch quickly followed by clicking
OK.

Atomic will prompt you to fill out the Screen Properties dialog.

Once you select Emulator Type, Atomic Stuido will fill in some of
the fields for you; like Command Parameters and
Roms Extension.
All you have left to do, is to specify the location of your Emulator executable, and the
folders for your Roms & Snaps.
Once you're done click OK.
Close
Back on main window, you new screen appears in the left list.
Right Click on the screen you created, to display the contextual popup menu.
And select Test Screen.

Atomic will run, and you should see your screen running!
Press ESC key to exit Atomic.
If your screen does not work, you can use the menu item Check Screen
to diagnostic your screen. Atomic will perform some checks for you.

Errors we can see on the snapshot here are due to the fact that the layout (skin) used for
your screen displays Custom1 object and that no folder have been
defined to grab data for that object.
Therefore in that case the screen will work, all errors are not "fatal", but it is better
to fix them if possible.
For that exemple, to fix these errors we would have to go to the
Define Layout Folders item of the contextual menu and define
folder for custom 1 objects.
Close
At this point, we can test the screen but if you start Atomic.exe
(outside AtomicStudio), it won’t start on your screen, but it still on the demo screen.
So we have to say to Atomic, on what screen to start. To do that:
Using Drag’n Drop, move your screen to the Right List.
Once your screen on the other list, click on Activate Project

Now if you exit Atomic Studio, and run Atomic.exe, Atomic will start
on your Screen.
Close
As your project stands now, Atomic displays a list of all roms that are in your roms folder.
But this folder can contain files that are not Game Roms, like BIOS for instance.
To avoid this problem, you can tell Atomic not to display certains Roms.
To do that:
Right click on your screen (in ether the left or right pane) to popup it's context menu, and
select Define Exclude List.

The define exclude list dialog opens.
In the left list, the list of avaible roms in your folder appears.
Select in the filter drop down list: (genre)[BIOS] and Click button
>>Filtered
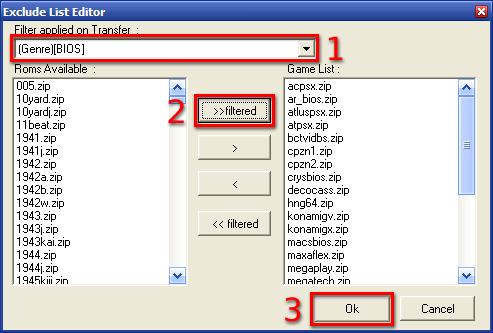
The Bios roms will be transferred to the right list. It is possible that some bios are missing
in that list, if the Filter used is not up to date, in that case you can simply select the
roms you want exclude in the left list and click > button to add
it to the exclude list.
Currently the filter provided are only for mame. So don’t expect to filter BIOS for a Commodore
64 emulator for instance. In that case, you will have to put roms in the exclude list using
> button.
After having clicked on OK button. If you test the screen or run
Atomic.exe, you list should not contains BIOS anymore. Selected
games have been excluded from the list.
Close
Now, we have a screen that display all roms (except BIOS). But if you want for instance have
a list that contains only platform games, you could of course "exclude" all game that are
not platform using the exclude list method. But it is not the more efficient method.
Atomic allows you to attach predefined game list to a screen. So instead of browsing the rom
folder and exclude unwanted roms, Atomic will load directly the roms you want in his list
and only that ones.
The method is very similar to the Exclude List. This is how to proceed:
Right click on your screen to popup the menu (you can click in the left or Right list), and
select View / Attach GameList.

The first time you use this menu item on a screen, Atomic will prompt you to know what kind
of game list you want create or Attach.

Select A Simple Game List and click OK.
The Game List Editor dialog opens. It is very similar to the
Exclude List Editor.
In the left list, the list of avaible roms in your folder appears.
Select in the filter drop down list: (genre)[Plateform] and click
>>Filtered button.

The Platform roms will be transferred to the right list. It is possible that some platform
game are missing in that list, if the Filter used is not up to date, in that case you can
simply select the roms you want exclude in the left list and click >
button to add it to the exclude list.
Now, when you test the screen or run Atomic.exe, the list will only contains plateform games.
That way, you can create your custom games list as you wish.
Close
Now, when we start Atomic, we arrive on a game list that display Platform games. But a good
thing would be for instance to start on a screen that display game categories (like Platforms,
Driving, Shoot Them up...etc..) then when we select a category a corresponding screen appear.
Here is how to do that:
For now we have only one screen which the platform one, we need to create others screens. For
this tutorial just create a screen that display only Driving game and one other for Shooter.
So redo, the Step 3 of this tutorial and the Step 7 to create your 2 new screens.
Name your driving screen: Driving Games, and as filter in the game list dialog use
(genre)[Driving]
Name your shooter screen: Shooter Games, and as filter in the game list dialog use
(genre)[Shooter]
So at the end, you should have in Atomic studio something like:

Don’t forget to test your new screens using the Test Screen menu
to be sure it works.
At this point, we have 3 independent Screens which are not linked. What we need now, it is a
Screen that will allows us to choose between these Screens.
So, to do that click on the New Screen button again, but this time
choose:
a menu to select emulator or categories or album

Once you click OK Atomic will prompt you for a
Layout (skin) and Screen Orientation.
For now lets leave it as is, and simply click OK.

After having clicked OK, your new Selection Screen
will appear in the left list.

At this point we have all that we need to build our first hierarchy.
But first we need to remove our first Screen from the Hierarchy, because we can only add
Screens in the Hierarchy under a Selection Screen, not under a
Game List.
To remove a Screen from the Hierarchy, simply right click on the Screen in the Hierarchy
(right list), and select remove screen from hierarchy.

Once the screen is removed, using Drag and Drop, put first, the Selection Screen
in the hierarchy.
Then, again using drag and drop put other Screens under the Selection Screen
(just drop the screen you want put on Selection screen in the hierarchy).
To finally obtain something like:

Click on Activate & Run button, to see the result in Atomic.
To "enter" in a category, press either the 1 or Return
key, once you are on a game list, if you want go back press either the 2
or Backspace key.
You will see that it is not perfect yet. First problem our "Platform" is named "Arcade Games"
end no image illustrate the categories. We are going to fix that in next steps.
Close
Our configuration Display "Arcade Games" instead of "Platform Games", so we are going to
change that.
The place where when atomic runs we can see "Arcade Games" instead of "Platform Games" is on
the Selection Screen.
So we have to change display names for the Selection Screen not the
"Arcade Games" screen.
Right click on Select Category Screen in the hierarchy and choose
Change Display Name item.

The Display Names Editor dialog opens.
The list of all screen of your project appear (not only the ones in the hierarchy).
Locate the “Arcade Games” one, and change the display name by “Platform Games” by simply
typing in the column. Then click save.

When the Display Names Editor close, nothing is changed in the
hierarchy. Don’t expect to see the screen “Arcade Games” renamed here. It is not what you
did, you only changed the “Display” name, not the Screen Name.
If you want see the result. Run Atomic.exe or click on Activate & Run
button. You will read now “Platform Games” where “Arcade Games” was displayed.
Close
You may want to associate an image to each screen to illustrate categories.
Generally for game list, a snap shot of the game illustrate each game. It is done automatically
by Atomic, it searches for a snap shop named as the game in the SNAP Directory you defined
in the Screen Properties.
For Selection Screen is a bit different because they don’t display list of rom but in fact
list of screens. So you have to associate image to a screen.
Here is how to proceed:
Select each screens you want associate image, right click, and select
Associate Image

Atomic will ask you to select the image you want associate with the screen.

Do that for all your screens. Then run Atomic.exe or press Activate & Run
button to see the result.
Close
Until now, when we built our screen we kept default layout. But you have the possibility to
dress your screens as you want!
To change the skin of a screen, there is 2 way to do that. One is via the
Properties item of popup menu. The other is via the
Define Layout folder item from the same menu.
Lets do it using the Define Layout folder.
Right click on the screen you want change layout, and choose
Define Layout folder.

The Layout Folder dialog appears. Click on the
... button next to the Layout Directory
field.

The Select a Layout dialog opens. Select a layout in the list, then
click Select

Back on the Layout Folder dialog, you will notice that the layout
directory path changed.
Most of layout displays a list and a snap, but some layout displays more like marquee, flyer,
cabinet picture, title etc..etc..
These layout need to know where to find images to display. It is the purpose of other field
in this screens. It really depend of the layout you use.
For instance, if you choosed a layout that displays a picture list instead of the classic
text list, you will have to complete the List Image Directory
field, otherwise Atomic won’t display image in your list.
But for now, let as it is, click OK and test your screen or run
your project, to see the result. If you think some image are missing on the layout, the cause
could be that another folder like custom1, custom2 or picture list should be completed too.
A good way to know what to complete, is to use the Check Screen
menu of your screen. Indeed the check screen procedure analyse the layout you choosed and
check if adhoc folder exists. For instance, if after a Check Screen
you obtains:
You can deduct that your layout uses custom1 object. So you should
fill the field Custom 1 Directory of the
Layout folder dialog.
Close
When you are on the dialog to select a layout, only few appear. They are layout that are in
the Atomic Layout Library.
But you may want use another layout that you made (using AtomicLayoutEditor) or one you
downloaded from Atomic’s Website.
To be able to use it, you have first to import it in Atomic Studio.
If you have downloaded a layout from a website, usually it is a .ZIP file or a .RAR file.
They are compressed, so first unzip or unrar it.
Locate the folder where there is inside the file Layout.cfg.
Then in AtomicStudio, from the menu select Project then
Import Layout.

When you click on Import Layout, Atomic will prompt you for a folder. Navigate to the folder
where you located the Layout.cfg file, and click
OK.

Atomic will import the layout in his library, depending of the layout it can take few seconds.
Once done, you newly imported layout will be selectable via the
Select a Layout dialog (see step 11 of this tutorial).
Note that a button Import Layout is also present directly on the
Select a Layout dialog that have the same effect.
Close
In same case, you may want for certain games in a screen run it with a different emulator or
with different parameter.
Typically you run for instance all your game with a version of mame (said 0.105 ), but for
few games you want run them with another version (said mame 0.90).
You could of course create a screen for mame 0.105 games and one for mame 0.90. But if it is
only for few game you can use the exception mecanisme.
Let says, you want run Donkey Kong with a different version of mame.
Select the Arcade Games screen (that lists plateform games now),
right click and choose Define Exceptions in the menu.

When the Exception Command dialog opens. Select the game you want
in the dropdown list (here Dkong.zip), type the full command line to run the game. Click on
Add Exception button, then click OK.

Now, if you run your project, and if you select Donkey kong it
will run using the command line you defined, instead the default one.
Close
With Atomic, it is possible to have in the same game list, game that runs with different
emulator. For instance a same game list can regroup games from mame, NES and Commodore 64.
All these games appear in the same list, when you run it, Atomic runs it with a adhoc emulator.
Let try that.
First you need a screen that run game from another emulator. Following the Step 3 of this
tutorial, create a new screen for your favorite emulator. In this example, I choosed a Atari
2600 emulator.

Test your screen to be sure it works and is able to run game.
So now, we are going to create another new screen that will contain game from Atari 2600 and
from Arcade.
Click on the New Screen button, Enter a screen name, said
“Multi Game List” and then select a list of game to launch and
click OK.

On the next Dialog Screen Properties, simply click
OK, don’t worry about what there is in fields.

Then select View / Attach Game List on the newly created screen.

On the next screen, where it asks what kind of game list you want attach, this time choose
a Game List that lists game that are defined in other screens and
click OK.

On the next screen, you have to select a Screen from where you want take games from.
When adding games you have the option of using a suffix appended to the displayed game name.
Now add the games you want from the selected screen to the new list.

Staying on the same dialog, Select the Atari 2600 screen and do the same thing with 2600 games.

Now back on AtomicStudio, test your screen, or Add it to your current hierarchy using Drag
and Drop and Activate & Run your project.
You will see a mixed list that contain game from mame and game from Atari 2600, that you
can run directly.
Close
You may wish to restrict access to certain screens, for instance if you have a screen that
displays a listing of Adult games.
Let’s suppose you want restrict access to your Driving Games screen.
Right click on the Driving Games screen, and select
Parental Control menu item.

A dialog opens, and select Enable Parental Control on this screen,
then click on the Define button. You will be prompted for a 6
char password, you can enter it with your control panel if you are on a cabinet or by
pressing key.
If you are on a control panel using you can for instance enter it moving your joystick to
enter something like left left right right button1 button2. Then
click OK.

Now when you Activate & Run your project, and try to enter the
Driving screen, you will be prompted for a password. While you
don’t enter the right one you won’t be able to access the screen.
Close
You can extend the features of Atomic by using Plug'ins. Atomic comes with a large collection
already, but you can also make your own.
Of course to make your own plug'ins you will need to know how to program, mainly in a language
like VBscript.
Thankfully using plug’ins does not require this level of skill.

To attach a plug’ins to a screen, simply right click on the screen and choose
Attach Plug’ins menu item.

When you click on the configuration button, depending on the plug’in you selected any number
of parameters may appear in the grid.
For simple clone launcher there is only one ACTIONKEYCODE.
This parameter is actually used to trigger the plug'in functionality.
To change it simply click on the parameter description ACTIONKEYCODE,
then a button Change Key code appear at the bottom of grid.
Course depending of the type of parameter different button may appear.
Click on it, Atomic will then prompt you to press the key you want use to trigger the plug’in.
Press it, and the new key code will be take in account, next click the Save
button.

Back on plug’ins dialog, click Close.
Now, if you test your screen, when you will press the key you defined, the plug’in will be
triggered.
In case of the simple Clone Launcher plug’in, Atomic will display a list of clones of the
selected games. You will be then be able to select a clone and run it.
Close
Until now we made setting for each screen individually. But some settings must apply to all
screens. For instance if you want make AtomicFe shutdown your PC when you exit.
In old version of AtomicFe you had to enable that Shutdown on Exit
settings on all screens. Now with AtomicFe 0.20, you can easily access global settings, by
pressing the Project Properties button.

Then the Project Properties dialog opens. This dialog contains few
tabs, each tabs contains various global option you can set.
For instance on the Global Options tab you can tick the
Shutdown the PC on exit.
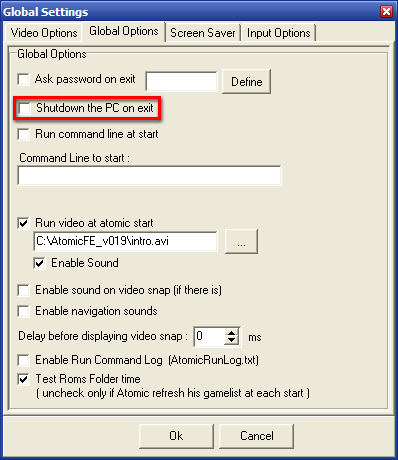
Atomic will now shutdown automatically your PC when you exit.
Close
You may need to run an exteranal program just before you start a game, and again once you
exit the game...or when you enter in a new Screen. You may also wish to define a custom key
that triggers an external application.
Typical examples are you may want to use a Control Panel Viewer tool, or send information to
a device like the Betabrite Led Display, or for instance change setting of your keyboard
encoder when game starts.
For instance, if you need to run the Winipac.exe to config your I-PAC with special control
for your game, and change the setting when you go back to atomic, you can process like that.
Select you screen, right click, and in the menu choose Options.

The option dialog opens. It contains lot of tab and let of options. By clicking on the arrows
in the top right of the dialog you can access to non visible tabs.

Access to the Auto External Command tab and set the parameters:

In this exemple, each time Atomic will run a game that is on your screen, it will run the
Winipac.exe passing the game.ipc config file.
When you exit the game, and just before going back to atomic, it will run the
Winipac.exe passing the Atomicfe.ipc config
file.
When you build the command line to run program you can also use key word like:
[ROMNAME], [ROMEXT],
[ROMDIR], [CONFIG]
For example, if as command line you put:
C:\WinIPac\WinIPac.exe C:\WinIPac\[ROMNAME]
.ipc
When Atomic will run a game, said Pacman, it will first run that command line:
C:\WinIPac\WinIPac.exe C:\WinIPac\pacman
.ipc
Atomic will substitute automatically the key word by the real rom name.
Note: there is another tab User External Command, that is very
similar to that one.
But this one is used to define command to trigger on user key press.
Close
There are numerous options to control the behavior of a Screen in Atomic.
To access the options, right click a Screen and choose Options
from the contextual menu.
The Options dialog has a lot of tabs, few are not visible directly,
you can access them by click on the arrows at the top right.
On the screenshot below, few current option are highlighted.

If you tick Enable Favorite List, favorite list management will
be enable in Atomic. You will be able to add or remove game from/to favorite list.
If Page Down jumps to next letter is ticked, then you press right
or left to browse page, Atomic will jump to the next or previous letter in the list.
If Turbo Browse in List is checked, Atomic will accelerate the
list browsing if you maintain one of the browse key pressed.
Close
Default main keys for Atomic are:
| á/â |
- Navigate in the list |
| ß/à |
- Page Down / Page Up in the list |
| Enter or 1 |
- Start game / enter in a sub screen |
| Backspace or 2 |
- Exit from a sub screen |
| F1 |
- Access to advanced filter menu |
| Ctrl |
- Add game to favorite list (If Enabled) |
| Alt |
- Remove game from favorite list (If Enabled) |
| Space |
- Switch between Favorites & Normal Lists (If Enabled) |
| Esc |
- Exit Atomic |
You may want change these keys assignment.
To do that go to Controls menu, then Configure.

Atomic Keys Manager dialog opens.
The first time you change key you have to use the Old Method tab.
Simply go on the tab and press Start button.

Then follow the instruction, Atomic will describe you the function, and you will just have
to press the key you want affect to this function.

Follow the process until the end, and then the Save and Close
button will be enabled. Just click on it to save your settings.
The next time you want change the key setting, you can do it key by key with the
New Method tab.

Close
If for instance you want use an external jukebox with Atomic, or run a external program from
Atomic, like Notepad for instance. You have the possibility to add
an entry in a Atomic Hierarchy, that when you will select it in Atomic will run your program.
Let do that for Notepad as example.
Click on New Ext. Prg button, and on the dialog that opens, enter
a Display Name, this name will be visible in Atomic. Then enter
the command line you want run. Here we run the notepad.exe.
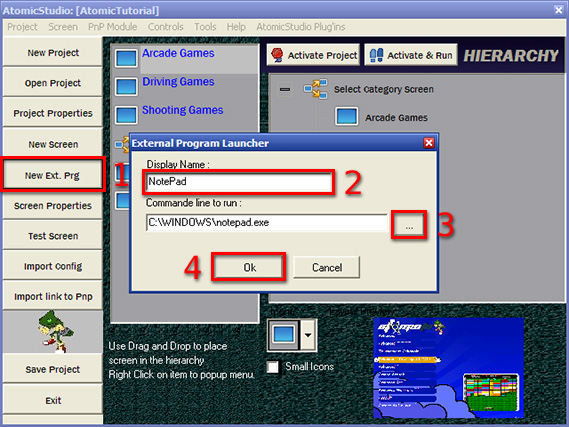
After having click OK button. You can see a new entry in the list
of screen.

As a normal list screen or a selection screen you can add it where you want in the hierarchy
by using drag ‘n drop.

Once in the hierarchy, you can run your project and see the result, you should be able to run
the Notepad from Atomic.
Close
AtomicFe has been done to work mainly with keyboard or keyboard encoder like JPAC, IPAC,
Keywiz. If you want control it with a PC USB joystick basic function will work. But control
won’t will be configurable.
IF you want use fully Atomic with a Joystick. You will have to use software that converts
joystick input to keyboard input.
Few tools exists to do that. Most of the Atomic users I know use:
Xpadder

Once properly configured, you will able to use Atomic as if you were using a keyboard.
Close
AtomicFe can support natively LEDWIZ and GP49WIZ, to configure Atomic for these device you
have first to access to LEDWIZ/GPWIZ manager. You can do that via the
Tools menu.

Then you will have to configure tool via the dialogs that opens. I won’t give detail on that
on this tutorial. If you want more information contact me on the Atomic support forum or
you can also read old documentation. The screen looks different but the principe is the same.
LEDWIZ-HOWTO (MS Word DOC)
Once you did your global settings for ledwiz of gpwiz. You have to active the adhoc option
for the screen itself.

Close
You may want use video snap (like for instance the circo’s emumovies collection) instead of
static snap with Atomic.
To use video snap, you have to put all your.AVI file in a folder and make point the
Video Snap Directory to that folder.

Conditions to use Video Snaps:
- Image Snap matching the Rom name is present
- Video Snap matching the Rom name is present
- The correct Video Codec is installed
If all this point are ok, the video should be shown instead of the static snapshot.
If you see strange effect on the video, like the video is reversed or if you can see green
square on the video, or something the video is very slow. It could be a problem of Codec.
Usually video you find on the net, want XVID codec. If you use a DIVX codec with a XVID
video you can have this kind of problem. The solution is to uninstall your codecs and
install only the XVID.
There is also different type of video on the net. Some in high resolution, and other in low
resolution. To manage High resolution video, Atomic have specials options.

Close
You may want AtomicFE starts when windows Start, to boot directly on the front end.
To do that simply go to the: Tools menu, item
Atomic Starts at Computer start up.

Close